When you log into your music app or social media account, your user experience is totally defined by your data. Your music app has your playlists and favorites, and your social media account is tied to your friends & likes. If you were to log into someone else's account, the app would look very different.
With Glide, you can make projects that are public and don't have any focus on User-specific Data. Often, you'll want to create a user-specific experience in a variety of different ways. For example:
- Allow users to save favorites
- Show different tabs to different users
- Only allow admins to edit records
- Let everyone have an individual rating for a specific item
- Let everyone see their own private notes about a particular item/event
- Allow a user to do or see something when they have reached a certain level
This guide will explain all the essential features you need to start building user-specific projects.
Access & privacy
In your project's privacy settings, you'll be able to choose whether your app is private or public. Depending on which one you pick, you'll see controls for which users can sign in.
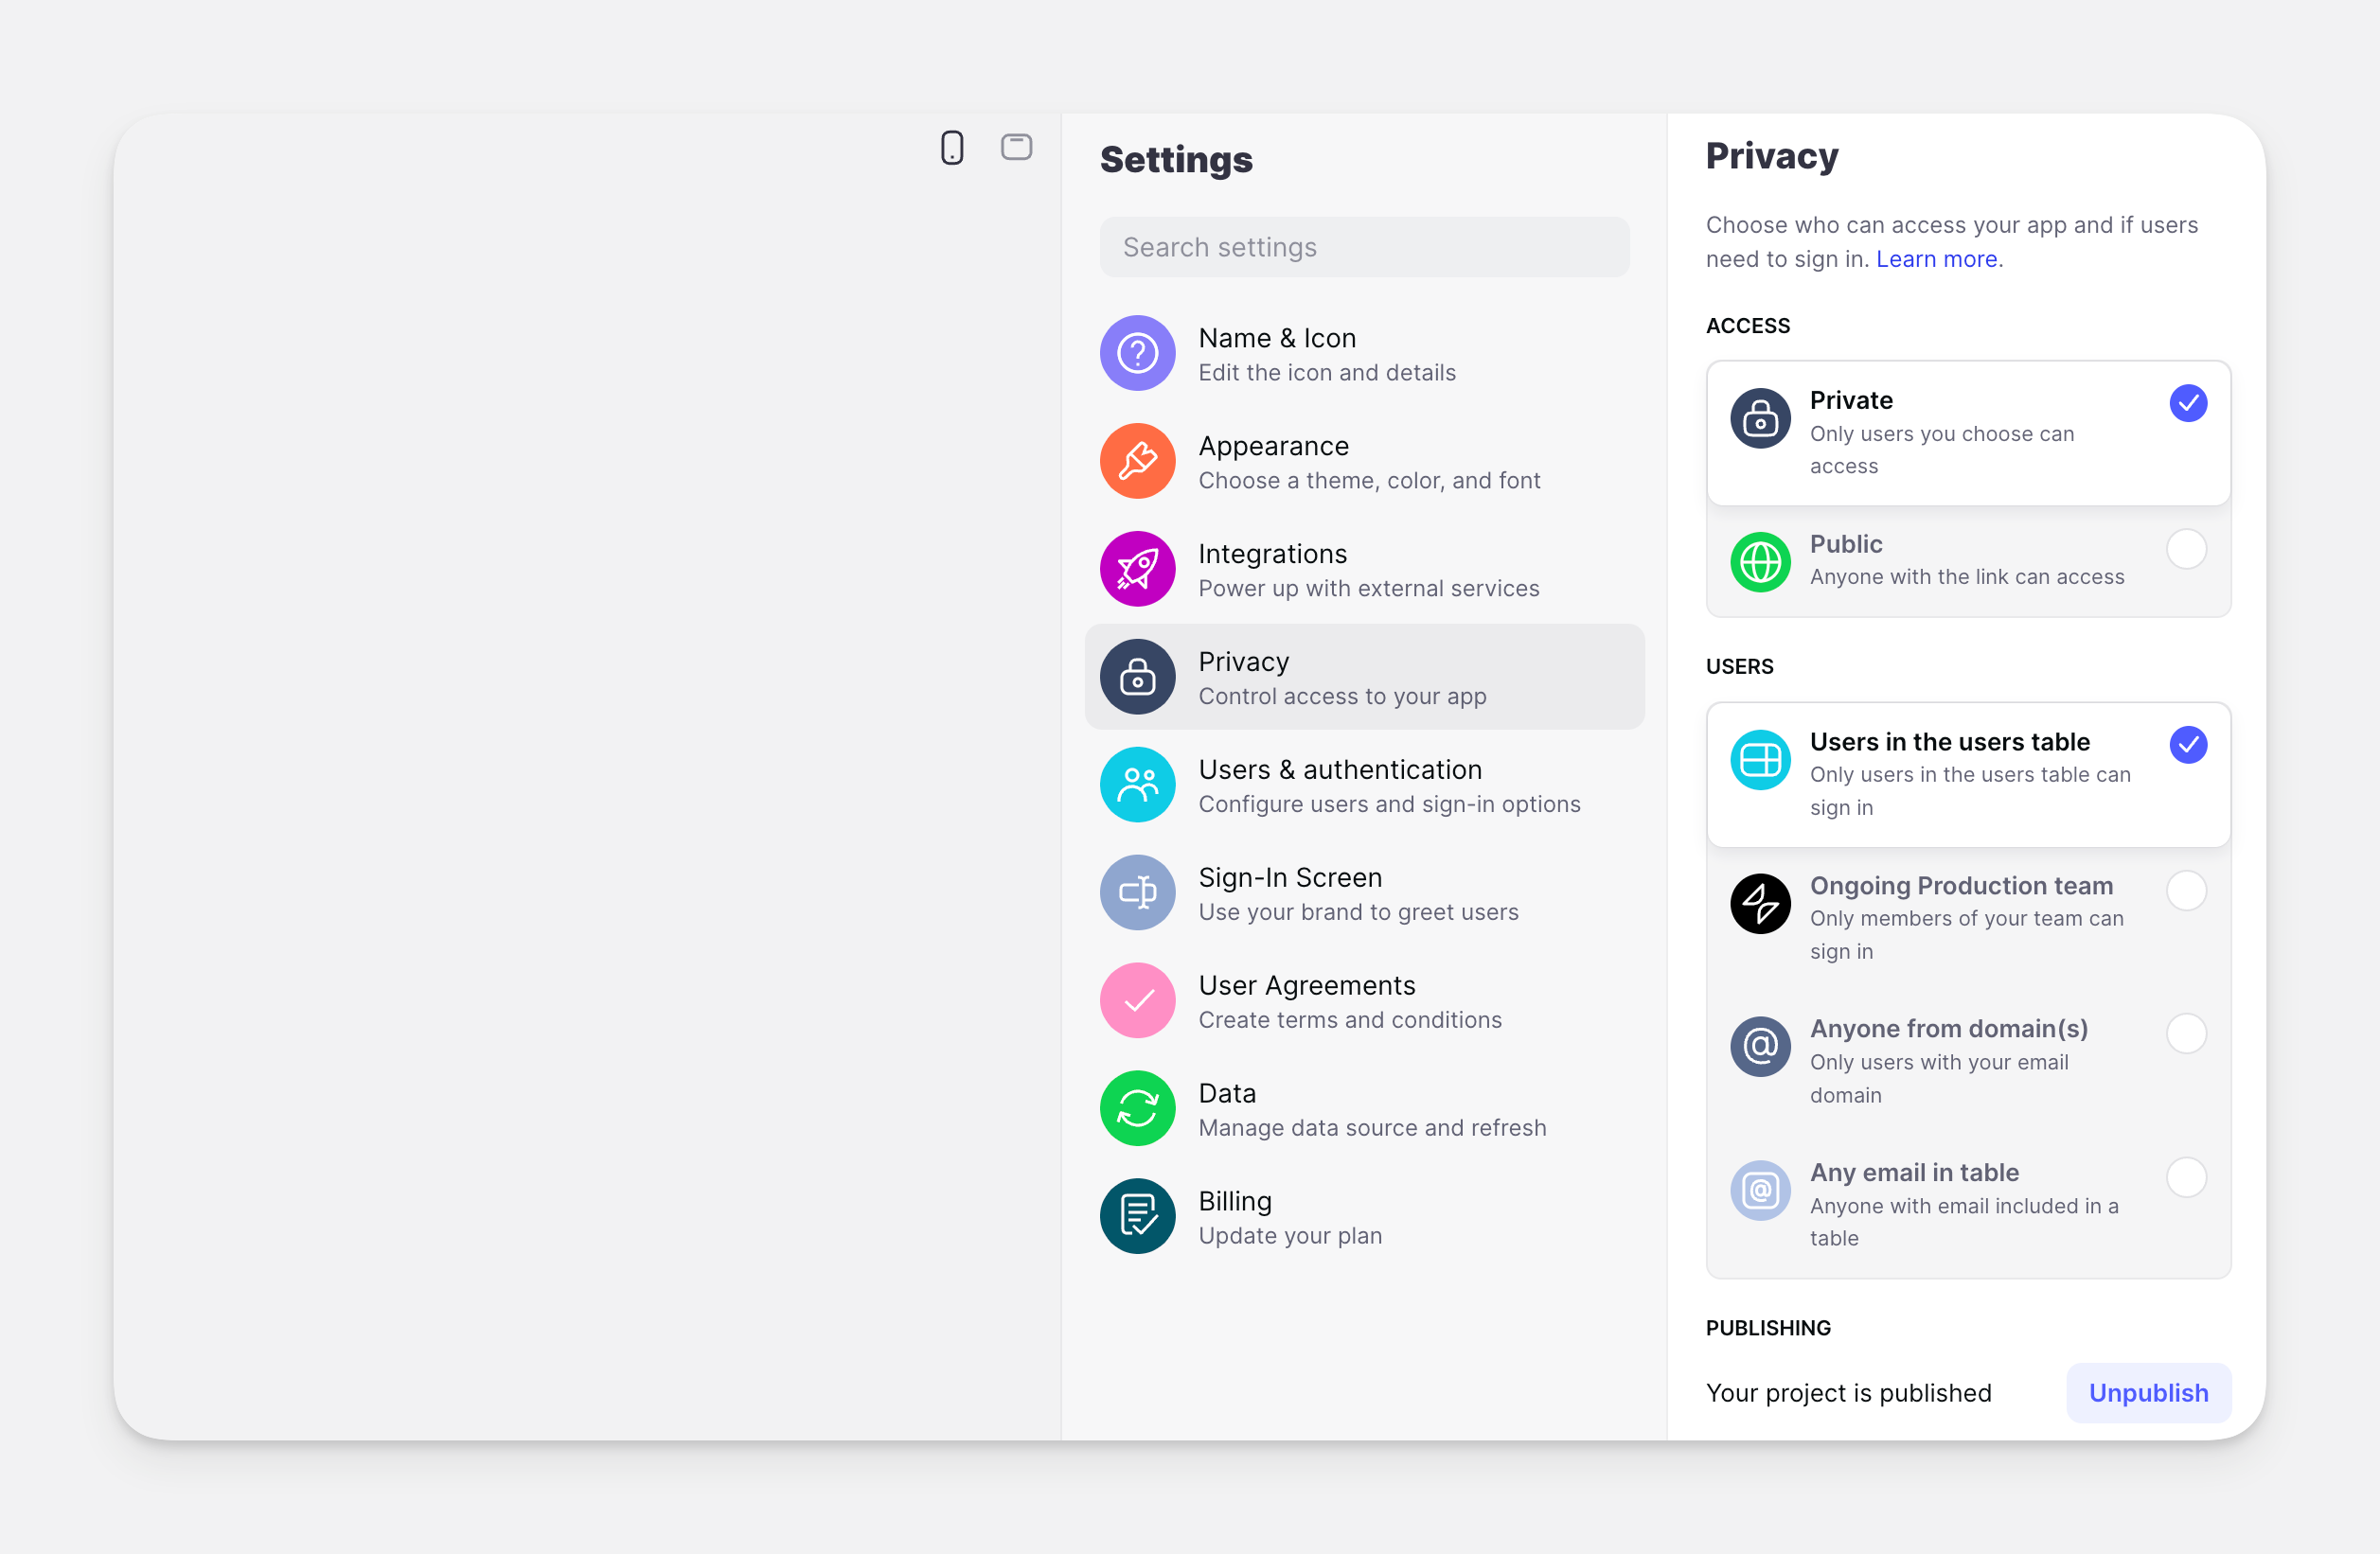
The project's privacy settings
There are quite a few different combinations you can create here. Below is a list of all the different types of access settings you can create.
Private projects
Private projects are not viewable publicly. Only the people you allow to sign-in in the users settings will be able to access your app. You can make private projects that are:
- Accessible only by users in the users table
- Accessible only by members of your Glide team
- Accessible only by people with an email matching your domain
- Accessible only by people in a specific table that you set
If your app contains any sensitive, private, or personal information, then you should use a private sign-in setting.
Public projects
Public projects are always accessible by anyone in the world who has the link. Using the combination of settings in the Privacy Settings area, you can create public projects that are:
- Publicly accessible with no sign-in (users won't have profiles)
- Publicly accessible, but users are required to sign-in
- Publicly accessible, with optional sign-in
User table
A user table is where the data for each of your users is stored. Every Glide project has one. Each row represents a user, and each column a property of that user. This table is essential unless your project is totally public with no sign-in.
When you create a new project, Glide will automatically create a Users table and assign it as your User Profile Table.
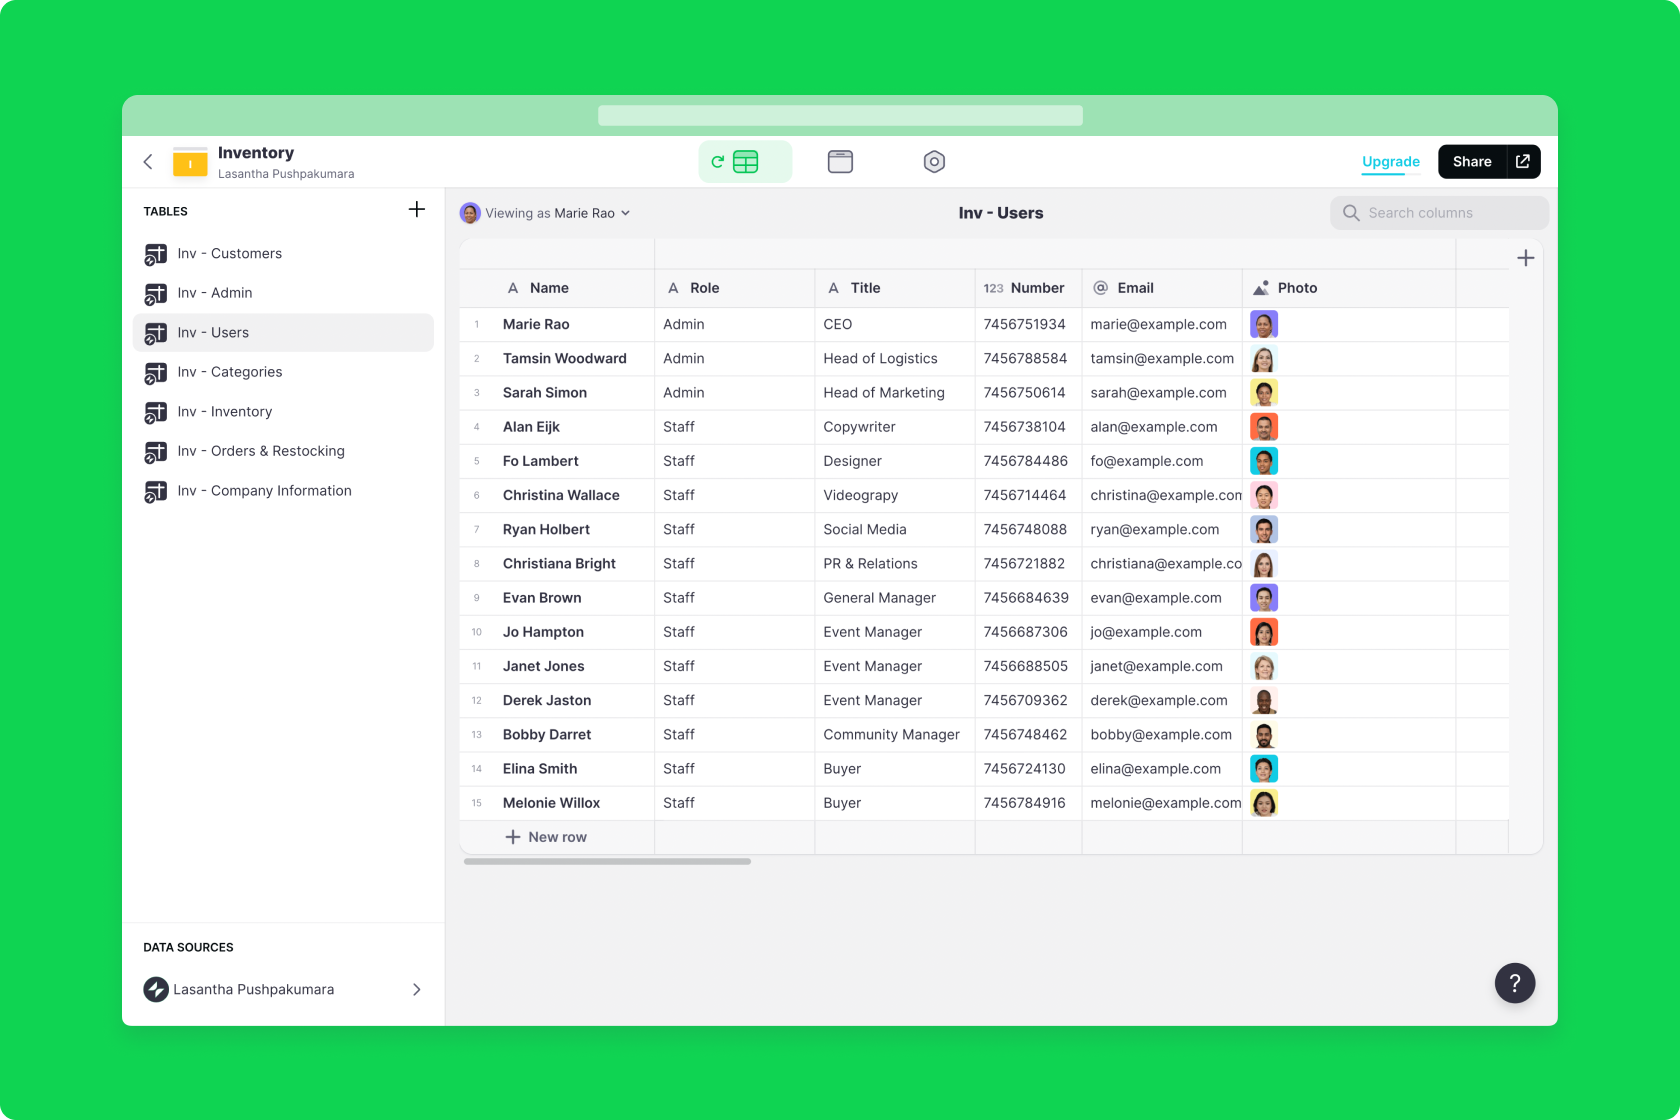
The User Table
At the very least, the users table needs a column for Name, Email, and Photo. Projects with sign-in can also use Role. You can add as many columns for your users and can use these properties in many different ways. For example:
- Only show users a tab if their
ageis greater than 15 - Create a list of all the users that signed up more than 5 months ago
- Give editing rights only to
Admins - Create teams that people belong to
- Show and hide items depending on users' interests
Row owners & user privacy
User data in a User Table is often private and needs to be kept secure. Row owners is enabled on user tables by default. Learn about Row Owners here.
User profile screen
When a user clicks on their profile image in the menu bar, they will be taken to their user profile screen — which is powered by their row in the users table.
You can configure this screen with Components to show and allow the user to edit their information.
On desktop devices this will be in the top right and on mobile devices this will be in the flyout menu in the top left.
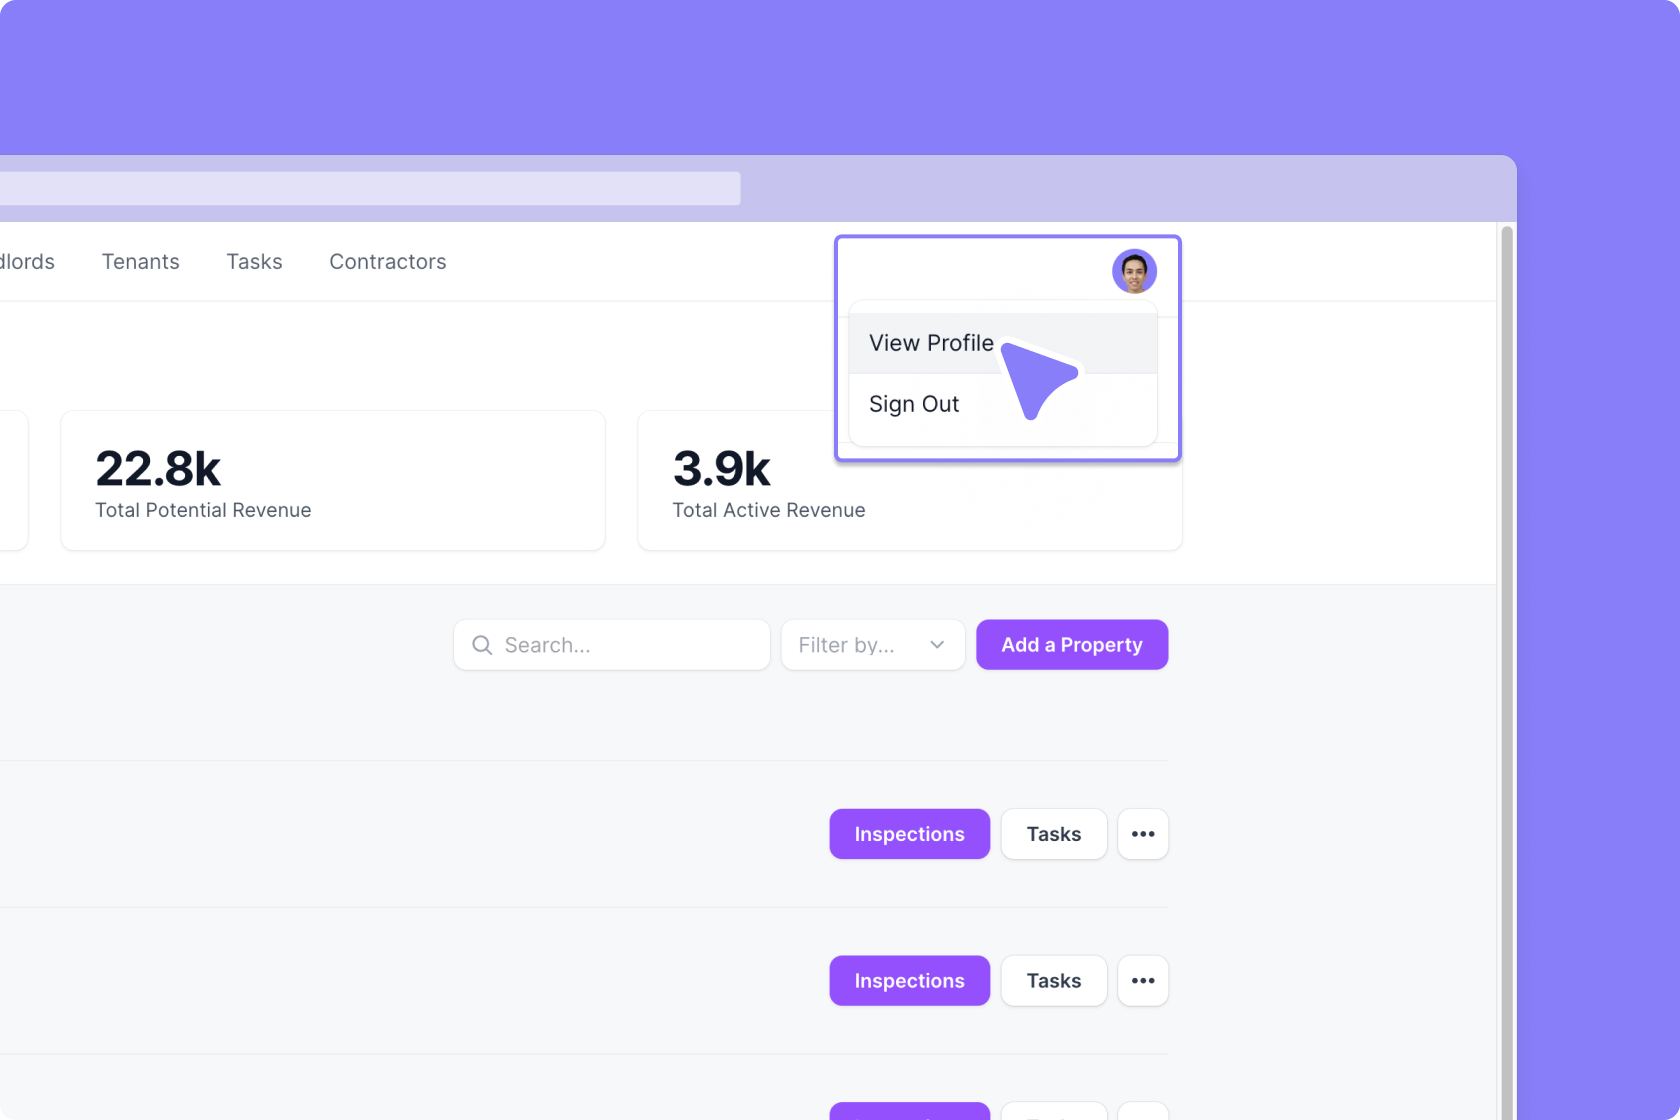
How to view the User Profile in a Glide App
Private vs. Public Users
Public users can access any public facing areas of your app. Private users can see special areas that you have given limited access to. After logging in, they have access to screens and functionality that public users do not. Both private and public users can sign in to your app.
For example, a publicly accessible app like a community platform could have public users who log in and interact with community-facing features. Private users in the community app might be internal employees who manage the community, see reporting data, manage membership, and more.
Preview-as
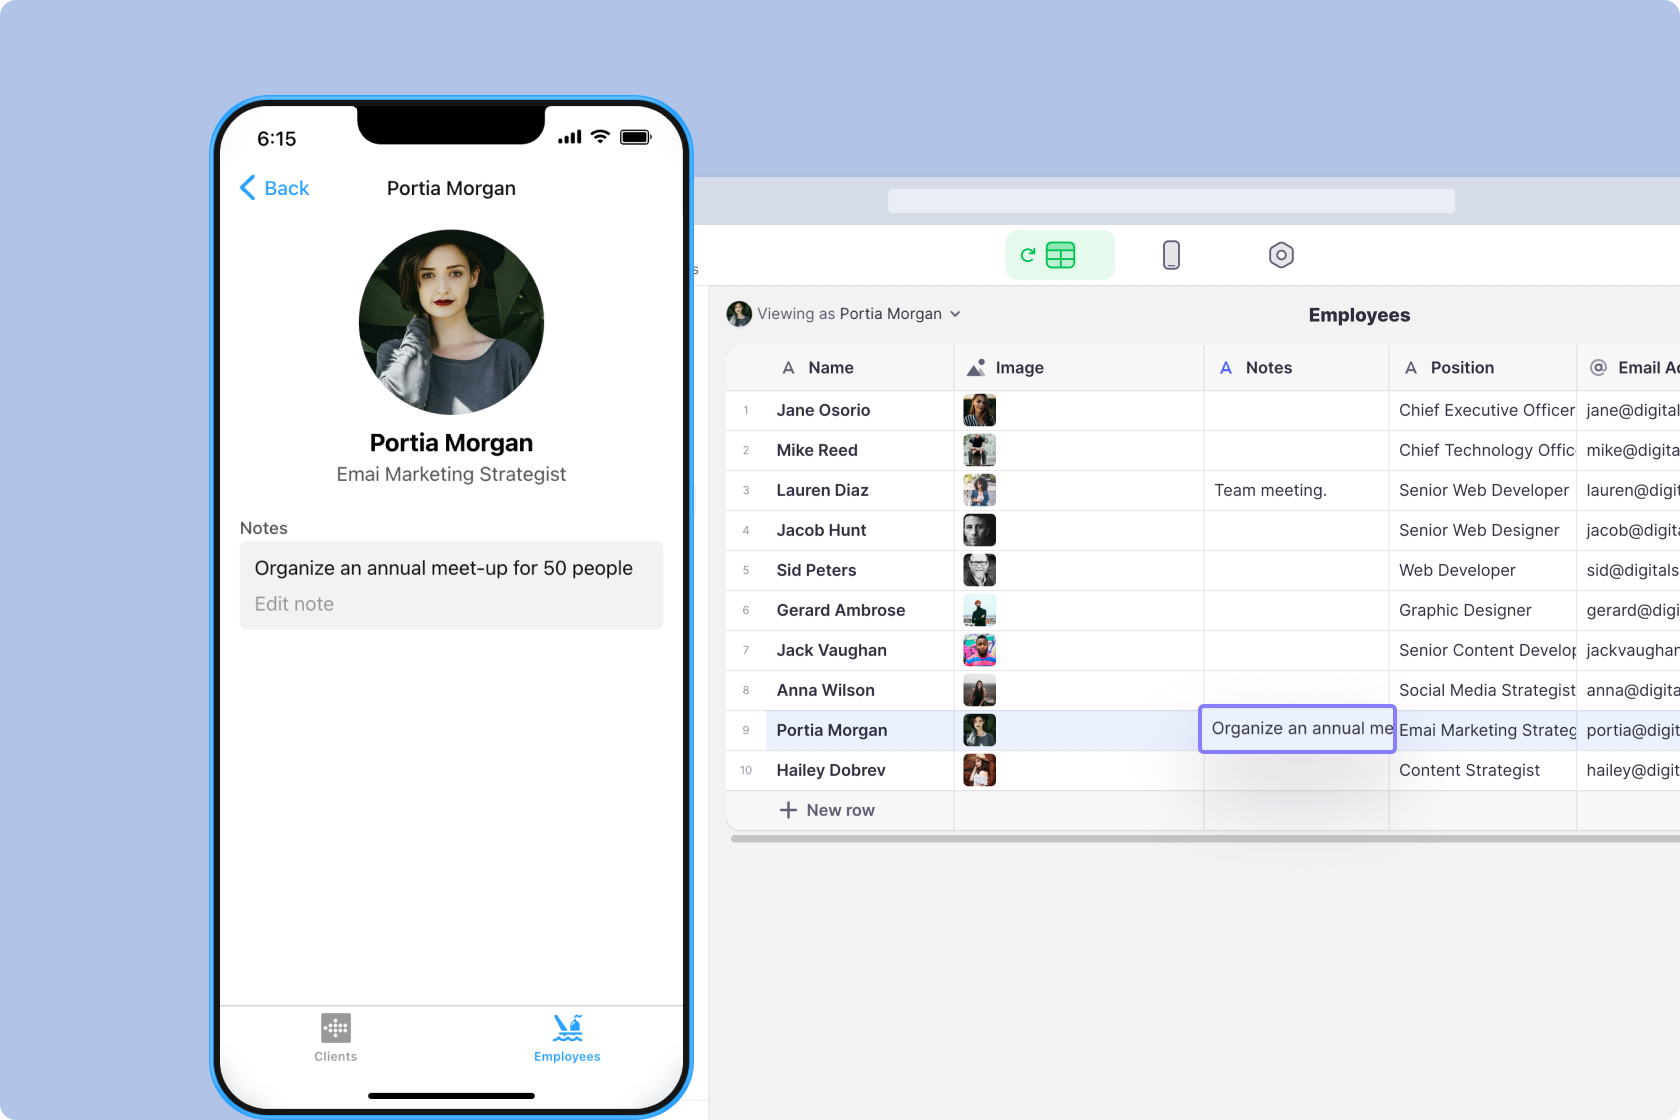
The Preview-as menu in Glide shows you all the users that are in your Users Table. Depending on your settings, it defaults to either viewing as Anyone or as the first user in the table. If you visit the User Profile Screen and switch users, you'll see the screen change. Or, if you're in the Users Table in the Data Editor, you'll see the data change.
This is an incredibly useful tool if you are building a project with lots of different user data and need to see the experience that different users will have.
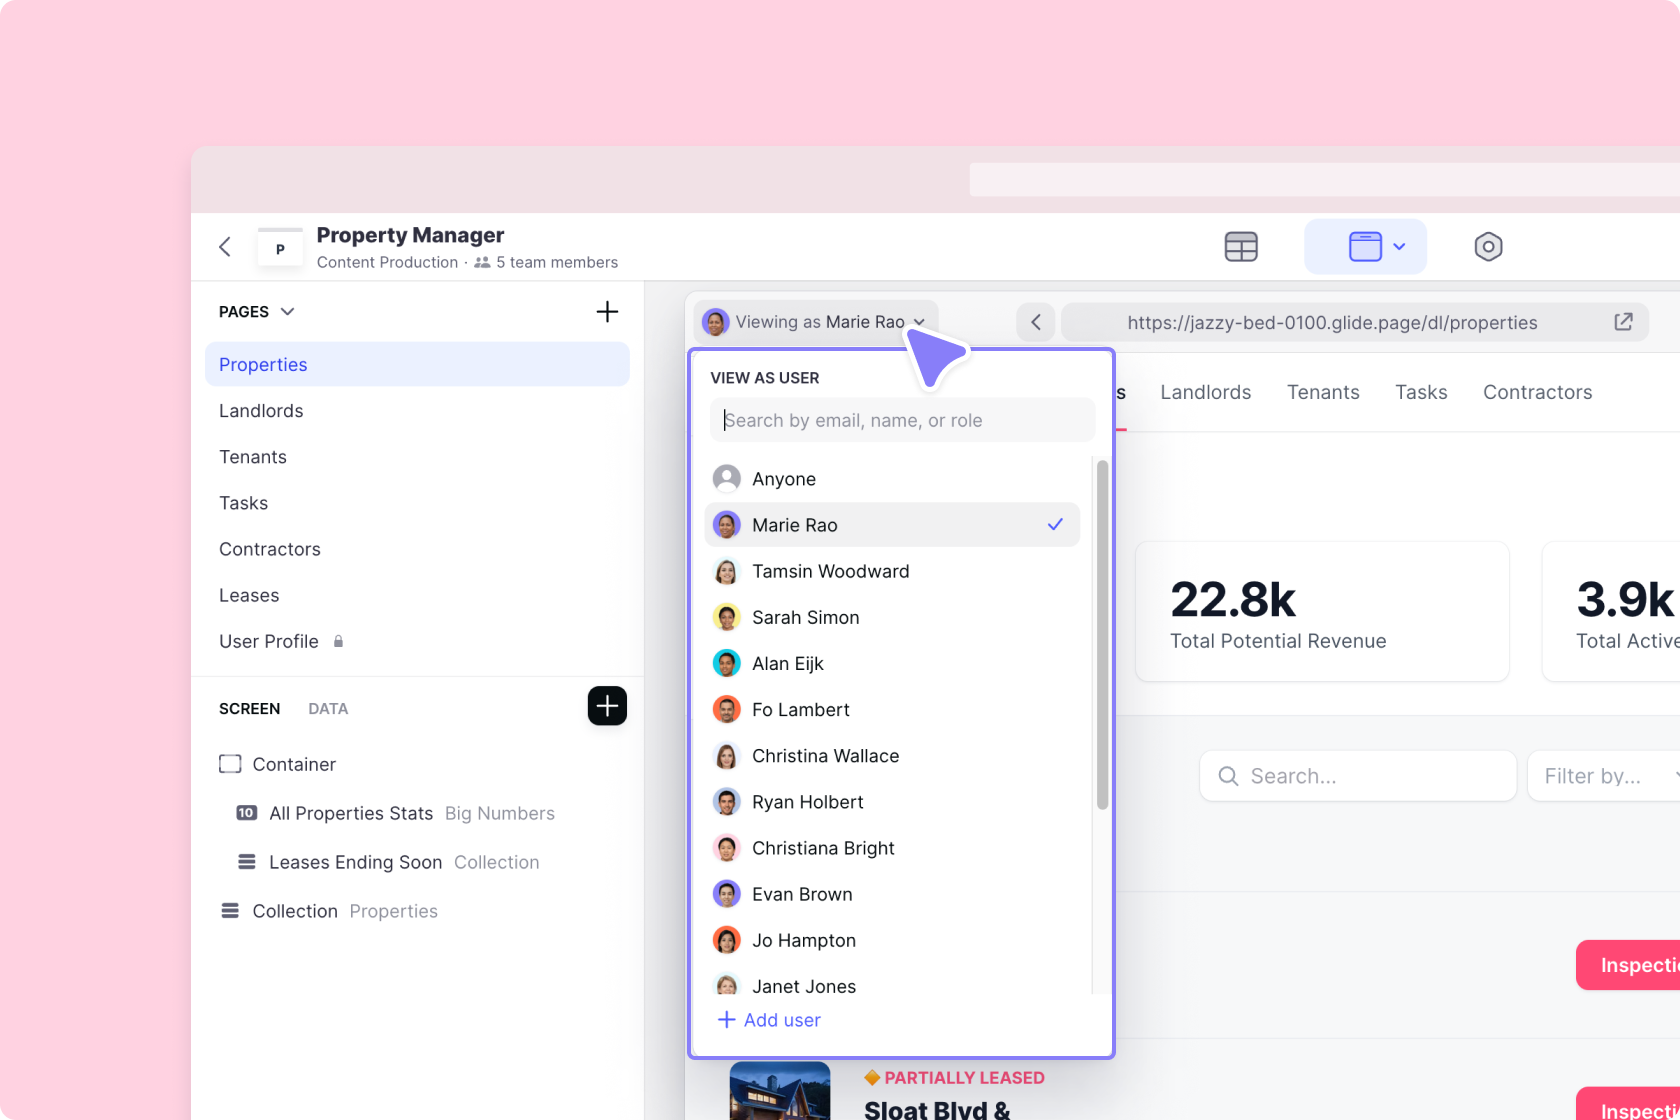
Opening the Preview-as menu in Glide
User-specific columns
User-Specific Columns allow cells to hold unique Data for each user. This means each user can experience their own data for a particular item.
For example, in the table below, there is a column for Notes. This allows users to write their own notes on each item in the app. In the Data Editor, you'll see a slightly different color for this column indicating that it's user-specific. If you switch between users with the preview as - you'll see the data in this column change and you'll be able to edit it for different users.
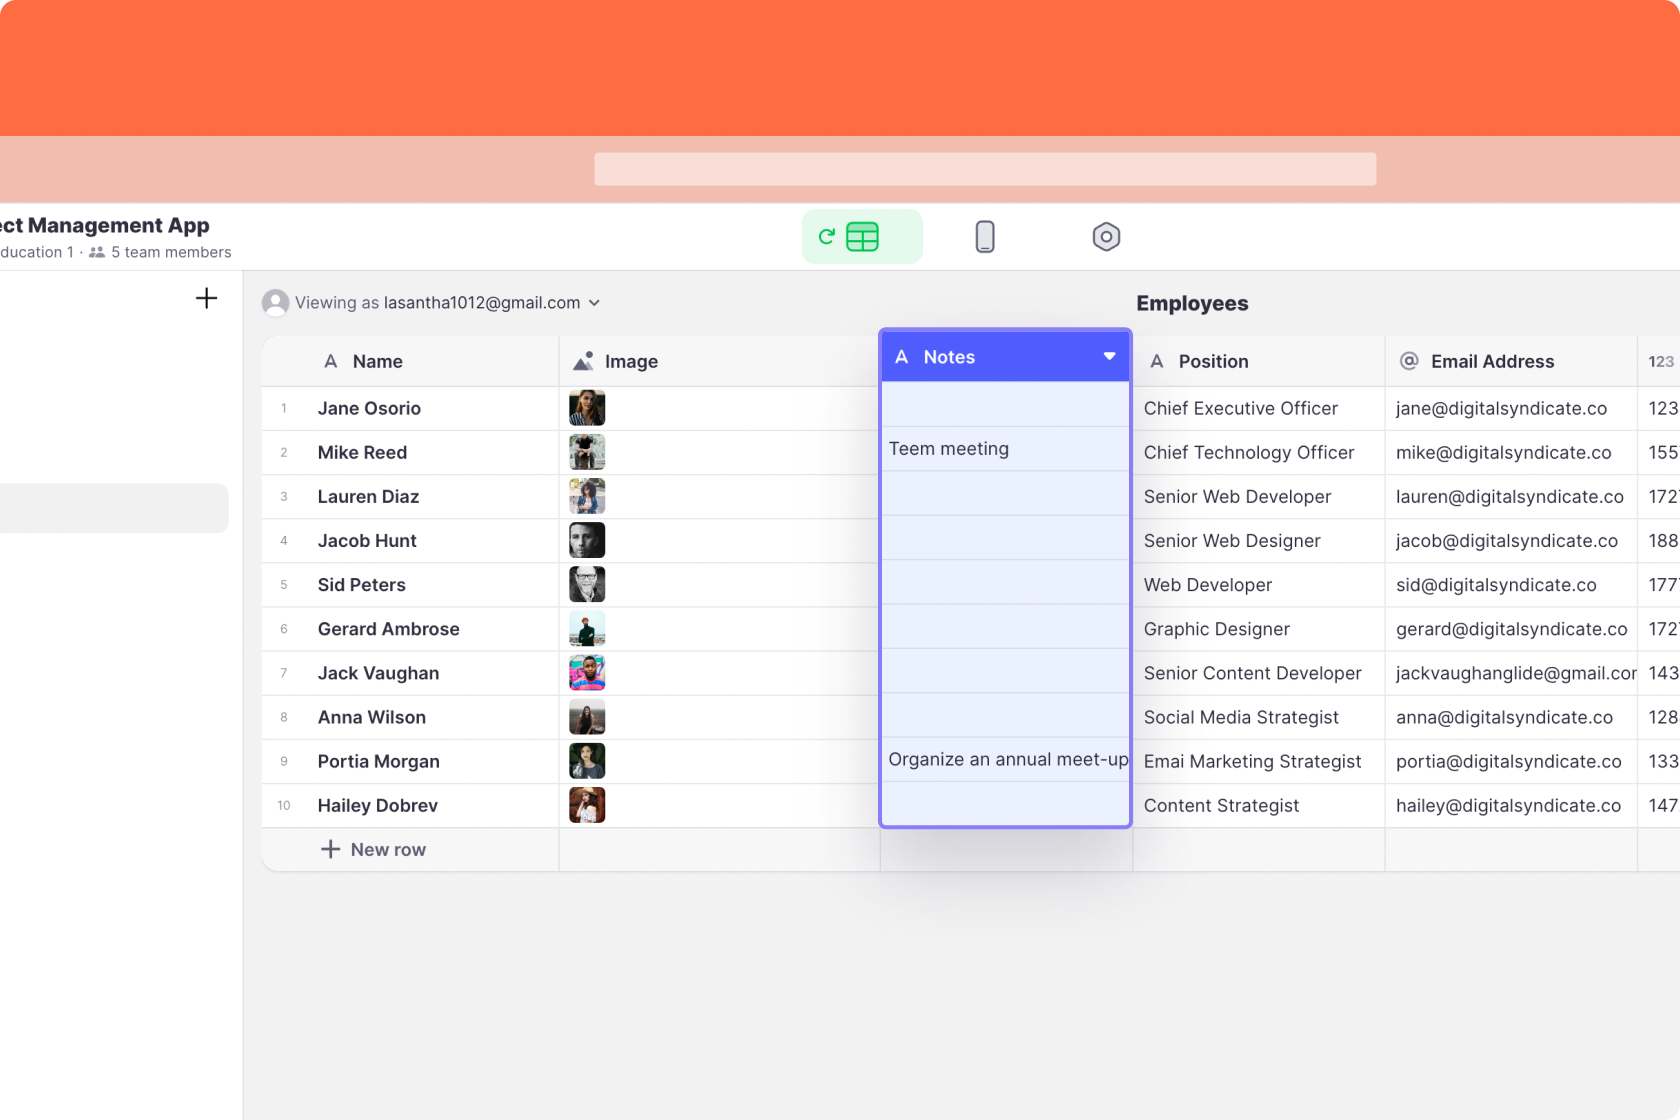
A User-specific column in the Data Editor
Without User-Specific Columns, this note would appear to everyone else who can see that row. And if someone else changed that note, it would change for everyone else. This is obviously not ideal!
Now, when users make notes in this section, those notes will be specific to them. In other words — that single cell will contain a unique value for each user. If you have 1,000 users, there will be 1,000 different versions of that cell — one for every user.
Roles
For greater control of your project's data, you can assign Roles to the users in your user profiles table. You can then use these Roles with Row Owner columns to make certain records only accessible to certain users.
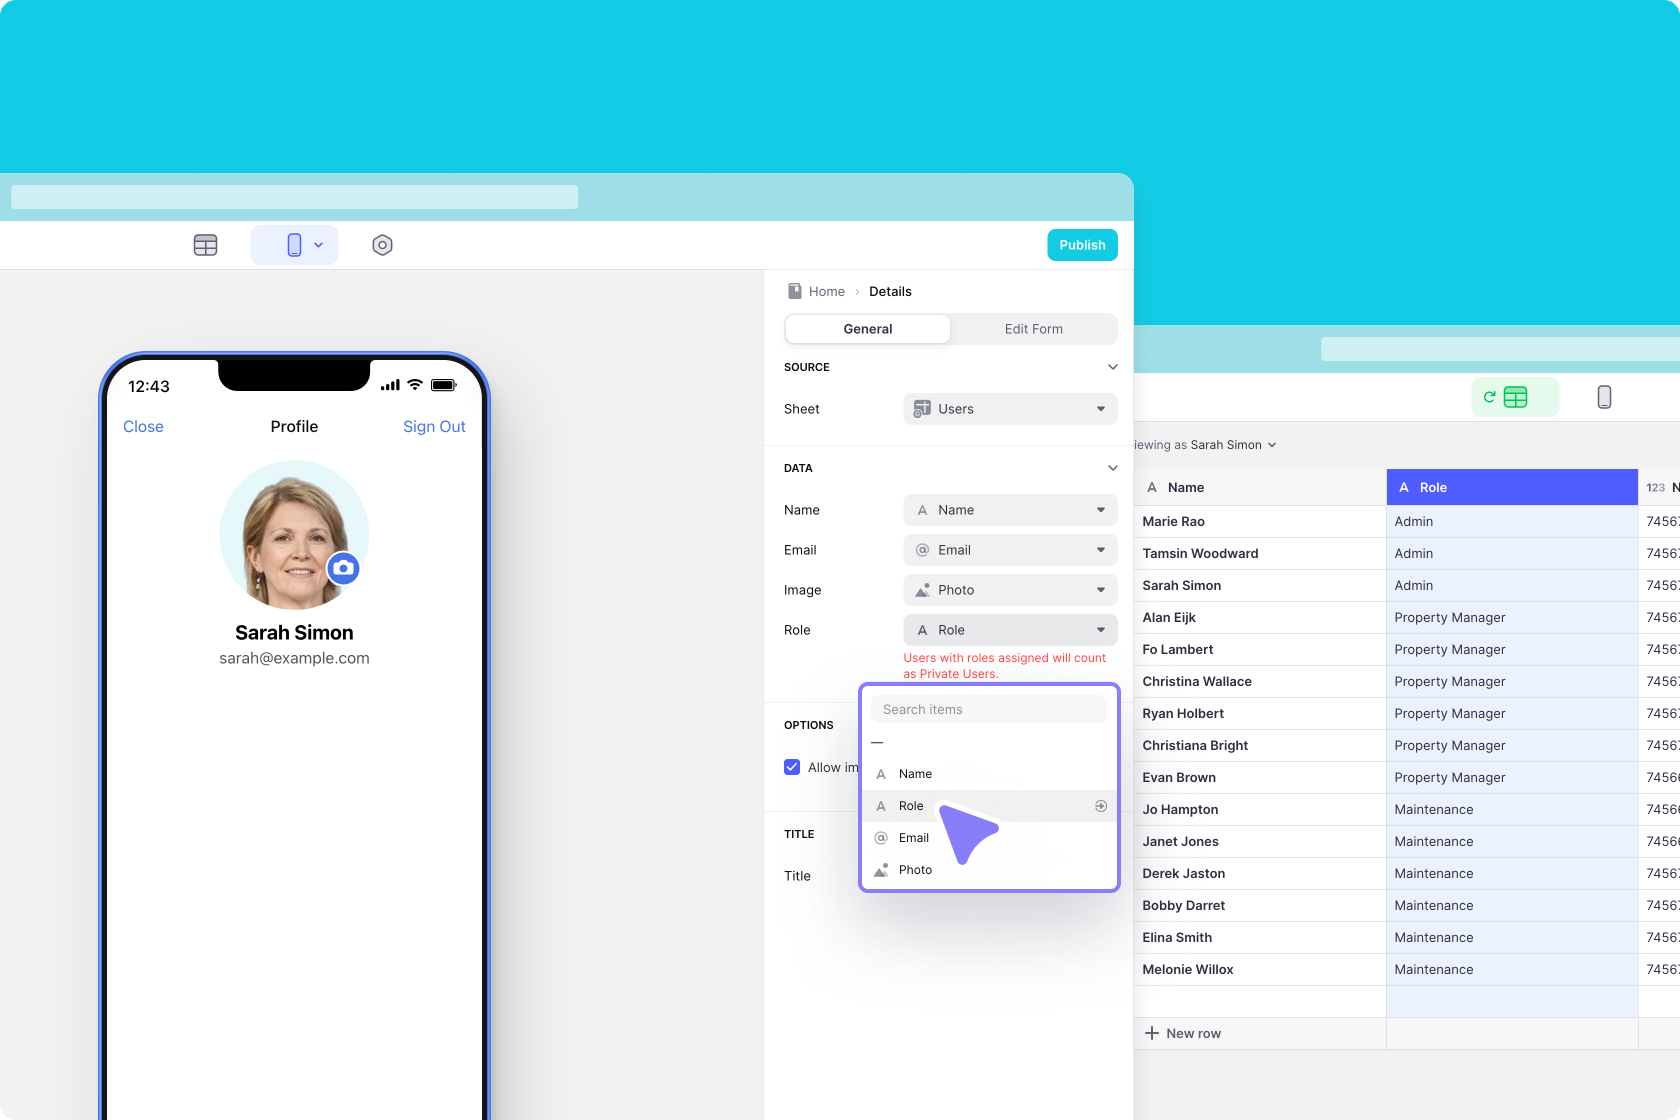
Setting the Role column in the User Profile screen
This allows you to, for example, give many people the role of 'Admin' and then make 'Admin' a Row Owner for certain rows. Now, only people with the role of Admin will be able to access those rows.